Bite-Sized Sweetheart Cheese Balls
Highlighted under: SugarAlchemy Kitchen
I love making Bite-Sized Sweetheart Cheese Balls for special occasions or just as a fun snack. They are not only delicious but also visually appealing and easy to prepare. There’s something so delightful about the creamy cheese combined with various herbs and spices, forming bite-sized treats that everyone loves. I find that the addition of a hint of garlic and a sprinkle of herbs elevates the flavor profile, making them a standout at any gathering. These little gems are perfect for sharing and guaranteed to bring smiles.
As I crafted these Bite-Sized Sweetheart Cheese Balls, I was reminded of how simple ingredients can transform into something extraordinary. Using a combination of cream cheese and shredded cheese, I found that adding a touch of fresh herbs really brings out the flavor. The key is to let the mixture chill for a bit before forming the balls; this ensures they hold their shape beautifully when served.
One of my favorite variations is to roll them in crushed nuts for added texture. I experimented with different toppings, and each gave a unique twist to the taste. If you’re short on time, make them a day ahead and let them sit – it only enhances the flavors!
Why You Will Love This Recipe
- Creamy, rich cheese bursting with savory flavors
- Perfect bite-sized portions for easy snacking
- Versatile toppings to customize to your taste
The Art of Flavor Balancing
Creating Bite-Sized Sweetheart Cheese Balls is all about balancing flavors and textures. The creaminess of the cream cheese provides a rich base, while the sharpness of the cheddar adds depth. When mixing in garlic, fresh chives, and parsley, it’s key to taste as you go—this ensures each cheese ball bursts with flavor. Garlic can easily overpower, so start with less and adjust to your preference. A pinch of salt enhances all the ingredients, making them pop without overshadowing the other flavors.
Choosing your herbs is another important step. Fresh herbs bring vibrant, bright flavors that dried versions can't match. If you're looking for a twist, consider using dill or basil. These herbs not only change the flavor profile but also add visual appeal when rolled in the final coating. Experimenting with different herb combinations can make each batch unique and exciting. Just remember that the focus should remain on the creamy cheese mixture, with the herbs complementing rather than dominating.
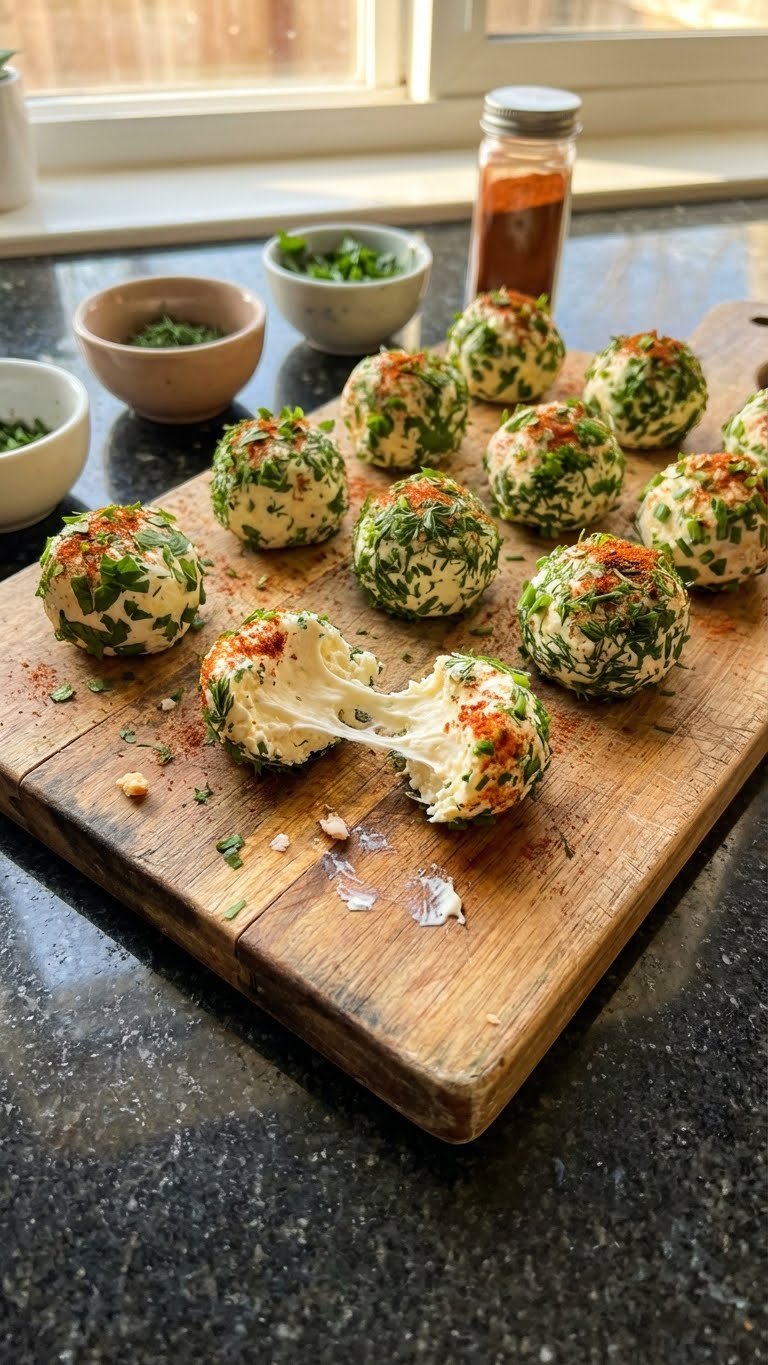
Perfecting the Coating
The coating of your cheese balls is where you have an exciting opportunity to personalize each bite. Crushed nuts add crunch and a nutty flavor, while fresh herbs provide a burst of freshness. If you're concerned about allergies or preferences, consider replacing nuts with toasted seeds like sunflower or pumpkin seeds, which still provide a satisfying texture.
Spices also elevate the overall flavor and aesthetic. Opting for paprika gives a smoky undertone, while chili powder adds a subtle kick. If you prefer more heat, consider using cayenne pepper. Remember that the outer coating contributes significantly to taste, so don’t skip this step—ensure each cheese ball is fully coated for maximum flavor in every bite.
Storage and Serving Suggestions
These cheese balls can be made ahead of time, making them a perfect choice for gatherings. Once formed, you can keep them in an airtight container in the refrigerator for up to three days. If you want to make them even further in advance, consider freezing them before they’re coated. Just place the formed cheese balls on a baking sheet lined with parchment paper, freeze until solid, then transfer to a freezer bag. When you're ready to serve, simply thaw them in the fridge and coat just before enjoying.
Serving suggestions are abundant; I like to pair them with an assortment of crackers, breadsticks, or even veggie sticks for a fun grazing platter. Consider adding a small bowl of homemade pesto or a zesty dipping sauce to enhance the experience. The visual appeal of these colorful cheese balls arranged on a platter with various accompaniments will surely impress your guests!
Ingredients
Ingredients
Cheese Ball Mixture
- 8 oz cream cheese, softened
- 1 cup shredded cheddar cheese
- 2 cloves garlic, minced
- 2 tablespoons fresh chives, chopped
- 1 tablespoon fresh parsley, chopped
- Salt and pepper to taste
Coatings
- 1/2 cup crushed walnuts or pecans
- 1/2 cup fresh herbs (parsley, chives)
- 1/2 cup paprika or chili powder
Instructions
Instructions
Mix the Ingredients
In a large bowl, combine the softened cream cheese, shredded cheddar cheese, minced garlic, chopped chives, parsley, and season with salt and pepper. Mix until well blended.
Chill the Mixture
Cover the mixture and refrigerate for at least 15 minutes to allow it to firm up.
Form the Balls
Once chilled, take small portions of the mixture and roll into balls, about 1 inch in diameter.
Coat the Cheese Balls
Roll each ball in your choice of crushed nuts, fresh herbs, or spices until evenly coated.
Serve
Arrange the cheese balls on a platter and enjoy with your favorite crackers or bread.
Pro Tips
- For a spicier version, add a pinch of cayenne pepper to the cheese mixture. You can also substitute the cheddar for your favorite cheese variety.
Common Troubleshooting Tips
If you find that your cheese ball mixture is too soft to form into balls, refrigerate it for an additional 10-15 minutes. This chilling period is crucial for allowing the mixture to firm up, making it easier to mold. Similarly, if the cheese balls aren't holding their shape after coating, ensure you’re handling them gently and not overworking the mixture, which can heat it up and soften it.
In the event that flavors feel underwhelming after mixing, consider adding a dash of lemon juice to uplift the richness. A touch of acidity can brighten the overall flavor, balancing the creaminess and enhancing the experience. Be careful to add small amounts until you achieve the desired taste—it's always easier to add more than to take away.
Scaling the Recipe
This recipe is easily scalable, depending on the number of guests or the size of your gathering. Each cheese ball takes minimal time to prepare, so multiplying the recipe is straightforward. Just keep in mind that if you increase the quantities significantly, you may need to mix in batches to ensure everything is evenly combined without overworking the cheese.
To scale up, simply double or triple the ingredients and adjust the coating accordingly. It's important to have enough variety in toppings so that everyone can find their favorite flavor profile. If you're making a large batch, consider setting up a fun topping station where guests can roll their own cheese balls, giving a personal touch to this delightful appetizer.
Questions About Recipes
→ Can I prepare cheese balls in advance?
Yes, you can prepare them a day beforehand. Just keep them covered in the refrigerator.
→ What can I use instead of nuts?
If you have nut allergies, you can roll the cheese balls in crushed pretzels or seeds.
→ Can I freeze the cheese balls?
Yes, you can freeze them. Just make sure to store them in an airtight container.
→ What are some variations I can try?
You can incorporate different herbs, spices, or even add bacon bits for a smoky flavor.
Bite-Sized Sweetheart Cheese Balls
Created by: The Bitehut Team
Recipe Type: SugarAlchemy Kitchen
Skill Level: Beginner
Final Quantity: 20 balls
What You'll Need
Cheese Ball Mixture
- 8 oz cream cheese, softened
- 1 cup shredded cheddar cheese
- 2 cloves garlic, minced
- 2 tablespoons fresh chives, chopped
- 1 tablespoon fresh parsley, chopped
- Salt and pepper to taste
Coatings
- 1/2 cup crushed walnuts or pecans
- 1/2 cup fresh herbs (parsley, chives)
- 1/2 cup paprika or chili powder
How-To Steps
In a large bowl, combine the softened cream cheese, shredded cheddar cheese, minced garlic, chopped chives, parsley, and season with salt and pepper. Mix until well blended.
Cover the mixture and refrigerate for at least 15 minutes to allow it to firm up.
Once chilled, take small portions of the mixture and roll into balls, about 1 inch in diameter.
Roll each ball in your choice of crushed nuts, fresh herbs, or spices until evenly coated.
Arrange the cheese balls on a platter and enjoy with your favorite crackers or bread.
Extra Tips
- For a spicier version, add a pinch of cayenne pepper to the cheese mixture. You can also substitute the cheddar for your favorite cheese variety.
Nutritional Breakdown (Per Serving)
- Calories: 120 kcal
- Total Fat: 9g
- Saturated Fat: 4g
- Cholesterol: 20mg
- Sodium: 150mg
- Total Carbohydrates: 4g
- Dietary Fiber: 1g
- Sugars: 1g
- Protein: 4g